How To Connect A Dockerized Laravel App To A Host Mysql Server On A Linux Vps
Suppose you're deploying a Laravel application in Docker and want it to connect to a MySQL database running directly on your VPS (host machine). In that case, this guide walks you through everything — from MySQL configuration to Docker networking.
Prerequisites
- You have a Laravel app running inside a Docker container.
- MySQL is installed and running on the host machine.
- The firewall is configured correctly.
- Docker is installed on your Linux VPS.
Step 1: Configure MySQL on the Host
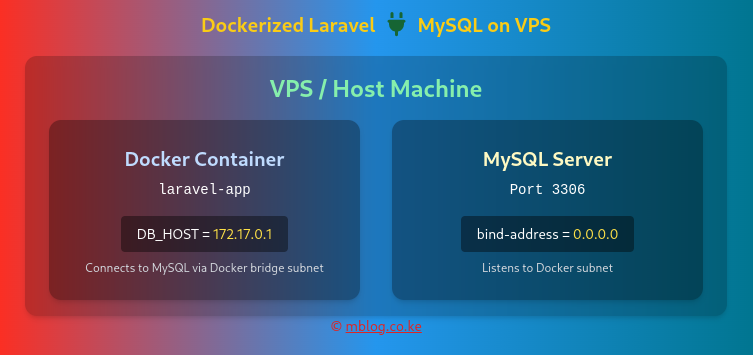
1.1 Allow MySQL to Listen on All Interfaces
Open your MySQL configuration file:
sudo nano /etc/mysql/mysql.conf.d/mysqld.cnf
Set:
bind-address = 0.0.0.0
Restart MySQL:
sudo systemctl restart mysql
1.2 Create a User for Docker Access
Log in to MySQL:
mysql -u root -p
Then run:
CREATE USER 'laravel_user'@'172.17.0.%' IDENTIFIED BY 'secure_password';
GRANT ALL PRIVILEGES ON laravel_db.* TO 'laravel_user'@'172.17.0.%';
FLUSH PRIVILEGES;
Step 2: Open Firewall Access
If you are using UFW(Uncomplicated Firewall), it may block the Docker container from accessing the MySQL service running on the host VPS. The solution is to allow the Docker container access to port 3306 or the port on which your MySQL service is exposed.
1. Get Docker Network Subnet
docker network inspect bridge
Look for something like:
"Subnet": "172.17.0.0/16"
Or if you are using a custom network
docker network inspect <network_name>
Take note of the subnet, e.g 172.17.0.1/16
2. Allow UFW Access From That Subnet
Run the following command, and remember to replace 172.17.0.1/16 with the subnet you found in step 1.
sudo ufw allow from 172.17.0.1/16 to any port 3306
3. Check UFW status
To confirm if the new rule was applied, run:sudo ufw status
You should see the subnet among the existing rules.3306 ALLOW 172.17.0.1/16
Step 3: Configure Laravel to Use the Host MySQL
Option A: Use .env File (Recommended)
In your Laravel project root, edit .env:
DB_CONNECTION=mysql
DB_HOST=172.17.0.1
DB_PORT=3306
DB_DATABASE=laravel_db
DB_USERNAME=laravel_user
DB_PASSWORD=secure_password
Then in docker-compose.yml:
services:
  app:
    image: laravel-app-image
    build:
      context: .
      dockerfile: Dockerfile
    container_name: laravel-app
    ports:
      - "8090:80"           # Laravel app accessible on port 8090
      - "5173:5173"         # Vite/dev server (if used)
    environment:
      DB_HOST: ${DB_HOST}
      DB_PORT: ${DB_PORT}
      DB_DATABASE: ${DB_DATABASE}
      DB_USERNAME: ${DB_USERNAME}
      DB_PASSWORD: ${DB_PASSWORD}
    env_file:
      - .env
    volumes:
      - ./.env.production:/var/www/html/.env:ro
    networks:
      - laravel-app-network
    healthcheck:
      test: ["CMD-SHELL", "curl -f http://localhost || exit 1"]
      interval: 30s
      timeout: 10s
      retries: 5

networks:
  laravel-app-network:
    driver: bridge
Option B: Define DB Variables Inline
You can hardcode DB credentials inside docker-compose.yml (not recommended for production):
services:
  app:
    image: laravel-app-image
    build:
      context: .
    container_name: laravel-app
    ports:
      - "8090:80"
      - "5173:5173"
    environment:
      DB_CONNECTION: mysql
      DB_HOST: 172.17.0.1
      DB_PORT: 3306
      DB_DATABASE: laravel_db
      DB_USERNAME: laravel_user
      DB_PASSWORD: secure_password
    networks:
      - laravel-app-network
    healthcheck:
      test: ["CMD-SHELL", "curl -f http://localhost || exit 1"]
      interval: 30s
      timeout: 10s
      retries: 5

networks:
  laravel-app-network:
    driver: bridge
Step 4: Start and Verify Docker
docker-compose downdocker-compose up -d --build
Step 5: Test MySQL Connection from Inside the Container
docker exec -it problem-signal-tracker-api bashapt update && apt install -y default-mysql-clientmysql -h 172.17.0.1 -u laravel_user -p
Note: This guide is intended as a quick-start walkthrough for connecting a Dockerized Laravel app to a MySQL server running on a Linux VPS. It does not cover Dockerizing Laravel from scratch, advanced Docker networking, or best practices for Laravel and Docker. For production-ready configurations, security hardening, and optimized Docker setups, consider consulting more in-depth resources for further guidance. Thank you for reading.

Jkm Dev
Author at Mblog. Full Stack web developer and a Laravel enthusiast.
Login
No comments yet.